tinkering- Loose Parts- Nature play- Building- Invitations- play prompts- Sensory Play- Small world Play
Hope was about one in a half when I took her window shopping for backyard play items for the summer. We were into open ended play ---as I was in my classroom and with the boys. She had put the Playmobil and Playskool playsets by the backdoor. She was pumped about taking her toys outside. She grabbed a container and we put the characters and animals in there so she could use them with all her playsets (now called small worlds). So I was ready to laydown a couple of hundred dollars for a swing set or a Little Tykes playhouse. She was not impressed with any of that. I thought she was being a hard sell on anything that I showed her.
So, I had decided to grab some plants and we could at least plant some flowers. When all of a sudden she burst with excitement. The hard plastic kiddie pools had caught her eye. And she couldn't even get her words out. She wanted the last purple pool to play in and two other ones... one for sand and one for water.
But the purple one was going to be magical because it would allow her to poof it into any playland that she wanted. She could play farm not just a barn. And she could play town in it instead of just a play house...and play beach instead of just sandcastle. She had the open ended play bug like crazy all summer long. I even made magic dust for her too use for when she "poofed" it. One of her favorite play phrases was "Poof it is a ... forest" or what ever she wanted us to imagine. Which was great because we learn her idea or agenda for the day and could get supportive toys for us to create what she wanted.
She had the bug for open-ended play...and we had a marvelous summer.
Open-ended play is a powerful tool for helping to nurture your child’s blossoming curiosity and creativity — but what does that mean exactly?
In this post, we’re going to discuss what open-ended play looks like and why it’s so important for every young developing mind.
So come along with us on our exploration of this popular play concept.
This post is all about open-ended play.
Why is Open-Ended Play Important & Does it Really Add Value?
Open-Ended play fosters a child's ability to build resilience, act independently and intentionally all while improving their ability to focus. All of which are valuable life skills your child can learn just from playing!
When you purchase something like a toy laptop, it can only be a laptop. Children aren’t encouraged to use their imaginations and are confined by the limitations of the toy.
With open-ended play, you build on open-ended toys without predefined uses to spark creativity.
In short… all the creativity that they can muster, turns playtime into an open ended adventure, whether we are inside or outside. Its a great time to introduce them to something new too.
1. What are the benefits of open-ended play?
Open-ended and imaginative play encourages young children to use their imaginations and explore the world around them.
If you think about it, kids used to be way more involved in open-ended play as they ran around outside with friends in unstructured freedom.
In fact, many of you may remember those days from when you were a kid.
Nowadays, there’s a multitude of different products and toys claiming to help with your child’s development, and parents may tend to hover a bit more than they used to.
But is all of that really what kids need?
Open-ended play encourages playing with toys in a multitude of different ways and offers an avenue for children to test out different ideas, make mistakes, learn from failures, and build resilience all while having fun at the same time! It's also making do with what you have, and saying "Lets pretend that is a... cow". Or using a block as a shaver, because you went to the barber shop and watched the barber.
Research shows that this type of play supports a number of different skills including, but not limited to, creativity, cognitive skills, social skills, and problem-solving skills by allowing kids space to think creatively and come up with their own ideas and solutions to problems.
This, in turn, helps young children become more independent and confident in their own ideas without the need for adult guidance or intervention.
With free play, it’s all about trusting your child’s imagination to figure out new ways to play with the same items, which in turn leads to a greater understanding of cause and effect, problem-solving techniques, as well as aiding physical and emotional development too.
2. How can you encourage your child to engage in open-ended play activities?
Encouraging children to engage in free play is a great way in early childhood to introduce them to a world of imagination and exploration.
One of the best ways to encourage your child’s open-ended play activities is to provide them with ample opportunity for discovery at home and when you are out.
This could include taking a trip to the park and allowing them to engage in unstructured play in nature or creating an open-ended play space at home that provides access to imaginative resources such as building blocks and fabrics.
A fun starting point is simply providing various open-ended play items like blocks, dolls, art supplies, and toys that can be used in numerous ways.
This will spark creative thinking while they’re thinking of all sorts of different ways to play.
You can also make yourself available for conversations by commenting on what they’re creating or offering help if needed – this will show your support, but try to make sure you’re not distracting their play and still allow them to come up with their own ideas and make their own decisions.
For outdoor playgrounds or parks, look for ones that offer lots of different kinds of equipment, from slides to swings, spinners, and climbers – these can facilitate more exploratory play as kids may naturally want to figure out how each one works with no specific end goal in mind.
You may even create a fun natural playground in your own backyard for your children to freely explore.
The key is to make sure your child never feels like there’s a “wrong way” to play with something, as this will discourage them from wanting to try out new things and new ways to play.
This is the perfect opportunity to trust their instincts, and learn a little bit yourself as you see the brilliant things they come up with all on their own.
It can also be helpful to limit the number of toys you put out for your child at any given time.
With fewer toys to play with, your child will be encouraged to be more resourceful and creative with the limited toys they have.
3. What are some activities and toy ideas for open-ended play that are fun and engaging for kids?
Open-ended play experiences for kids can be a great choice since they have the potential to keep children engaged and entertained for hours.
Examples of these could range from wooden blocks and stacking toys, which help develop their hand-eye coordination and fine motor skills, all the way up to something more advanced like magnetic tiles or Legos that give them many options regarding what they can create.
The sky’s the limit! Whatever their brain can think up, they can create.
In addition, outdoor play offers tons of benefits and an abundance of open-ended materials for kids to play with without having to spend a single dime.
Natural materials like pine cones can be used as play food, or a stick can be used as a telescope.
The options are open to whatever your child can create and imagine.
If you’re still stuck on what to get for your kids, there are some companies like Lovevery (which is AWESOME by the way!) that make this incredibly easy for you by selecting and shipping open-ended toys and activities right to your doorstep.
They choose which toys will be best for your kids based on their current age and stage of development so you don’t even need to think about it.
Overall, engaging with these kinds of toys encourages kids to think outside the box, giving them an opportunity to explore different ways to do things, and exercise their imagination.
I’m just using board games as something that probably doesn’t have the same opportunities for creativity and imagination as other toys since there’s really only one way to play the game
And, if you don’t play the game the right way, you’re probably going to annoy everybody you’re playing with so straying from the status quo usually isn’t encouraged.
4. How does open-ended play help children learn problem-solving skills and creativity?
The creative nature of open-ended play makes it a great way for children to learn problem-solving and critical thinking skills.
Through this type of play, children learn to explore new ways of doing things and gain confidence in finding solutions on their own.
Thanks to open-ended play, children can be encouraged to let their imaginations run wild and exercise their own creativity without restrictions or boundaries.
This arises from the child’s natural curiosity, as when playing with open-ended materials they are constantly looking for new opportunities and developing new ideas.
5. Are there any drawbacks to open-ended play?
Although open-ended play is incredibly beneficial for children, there are a couple of things to consider.
Encouraging your child to engage in open-ended play has long-term and lifelong benefits. It will help them become more confident and creative and grow their problem-solving skills. When I reflect on my daughter's colorful robot, I am amazed by the creativity and effort it took to come up with the idea and the confidence she had once she had created something totally unique and individual.
"Play is the language of children; it's how they learn, grow, and develop," says Henderson.
Remember the jokes we always make about our kids loving a cardboard box more than their actual gift? Perhaps we should just start offering them a cardboard box with some art supplies and let their imaginations run wild.
By preparing properly and staying present during open-ended play periods, parents can ensure that their kids not only benefit from the power of exploration but also stay safe and comfortable along the way.
We hope this article has encouraged you to think about the importance of open-ended play in your child’s life and how you can start to incorporate it into their daily routine.
If you found this article helpful, please share it with other parents or caregivers who might benefit from reading it.
Together, we can help create a generation of kids who are creative, independent thinkers!
ENGAGING IN OPEN ENDED PLAY
December 2, 2019
Engaging children in play is a hard sometimes, especially for the little ones under 2!
Don't worry you're not doing anything wrong, their attention span just isn't very long. Providing real life experiences should be saught after before handing your little ones a new toy (especially open ended toy). Relatable experiences are what gives the toy and value and playablity. That is why dogs, cats, rabbits, squirrels, butterflies, birds, flowers, cars and beach and farm toys are popular choices.
(Now I say this knowing that the first toy that Hope asked for was a small soft red lobster from Las Vegas. We lived in Colorado, but it was red. And she was using a red discovery basket before we left. So it was the color that she related too... And that it fit in her hand.)
Childhood development experts say that a reasonable attention span to expect of a young toddler is two to three minutes per year of their age. For example a child that is two could maintain focus on their task for up to 6 minutes. Some could be longer, some could be shorter but that's just an average.
I don't know about you but those statistics seem pretty spot on for my kids!
So what is open ended play?
Open ended play is play that has no set of fixed way that a toy should be used. There is no set outcome and no 'right' or 'wrong' way for the toy to be used. Open ended play often can be fun for all ages (even parents). Open ended play can turn into imaginative play in a second. "Let's pretend this is a..." is said alot. Parents can set up prompts and invitations to play, leaving how to play and how long to play up to your little one.
So.. what is open-ended play? It is play with no direction, play with no limits, rules, or interference, it is letting a child use their imagination free from predefined limits.
Does this mean you should let your child go in the kitchen and “play” with the oven… No.
Open-ended play should be done in a safe space, with access to open-ended toys and indirect adult supervision or interference. It's simply not parent directed. That doesn't mean that you cannot set up play prompts, as long as you allow them to choose how to play with the selected items.
Open-Ended Play Helps Develop Fine Motor Skills
Ripping off the remaining wrapping paper and tape is great exercise for small fingers and hands. Perhaps your child will decorate the box using crayons or markers – maybe even paint. All of these activities strengthen those muscles that enable a child to hold a pencil, tie shoes, grasp a crayon, move a bubble wand, and zip a zipper.
Gross Motor Skills
Crawling, jumping and running through and around the box improve your child’s gross motor skills, as does balancing and mastering an obstacle course. Every time he climbs into or out of that box, he is getting stronger and more proficient at moving his body!
That Box Can Help with Social-Emotional Development
Your child might have siblings, and they might play with that box together. What a great opportunity to build social-emotional skills like working together, sharing, compromising, negotiating, empathy, sympathy, etc. It’s a BIG job to manage your own feelings! Inevitably, conflicts will arise – how will your child get through these conflicts? Will he talk, cry, whine, hit, or something else? Each time he navigates a disagreement, he learns tools for the future!
Open-Ended Toys Promote Language/Literacy Skills
Deeply connected to social-emotional skills, language skills are necessary for all of us to get through the day. We communicate verbally as well as non-verbally. Has this box suddenly turned into a bus? Through pretend play, your child will use language to test out new words relating to buses! Drive, horn, honk, exit, money, seat, etc. – what fun he will have trying out this new vocabulary! Language and literacy also refers to the written word, which might involve making tickets for the bus, or writing the name of the bus on the side of the box. Maybe your child will need a name tag because he’s the bus driver!
Cognitive Skills- Improve Your Child's Problem-Solving Abilities
Your child will be solving problems and making decisions in his own head before you hear one word of it! Where does his bus go? What’s that one song people sing about a bus!? Oh, yeah! ‘the wheels on the bus go round and round…’
Does your child focus on creating his bus? Is he busy for thirty minutes solid before coming up for air? Or maybe he’s distracted by so many ideas at once. Open-ended play can be changed immediately by your child – with no adult help!
Imagination – Play Without Borders is the Foundation of Learning
This is where a box beats out a keyboard every time. On Tuesday, your child is ‘driving a bus’ with that box. By Thursday, the box has turned into a castle, and your child is the king. Your dog is a knight. Imagination has no limits.
Open-Ended Play is Very Important for your Child's Development
Even a box could have play VALUE – or, really, any open-ended toy. No amount of technology can do for the developing child’s brain what a box, a pile of clay, or a tub of wooden blocks can do.
How can you encourage children to engage in open ended play?
Children might need some ideas as to how to play with these toys (especially if it's new to them)! Or you might make a suggestion or two to get them started.
When we started our open ended toy collection we started with wooden blocks and Duplo's, Little People and Playmobil playsets, a "magical" purple kiddie pool, chunky animals and figures and 6 Rainbow Balls.
Before we invested in these toys though we did a lot of DIY activities and only had simple things such as balls, pom poms, popscicle sticks, boxes, tins, sticks etc. and with these I would create many different activities.
These items serve the exact same purpose (they just aren't as pretty) as the beautiful toys we stock but it is still considered open ended play!
With the Playmobil and Little People sets, we used to set them up as invitations to play after our eldest daughter (17 months) went to bed for her to wake up to in the morning.
When her little sister came along she was just 20 months old and I also found this a life saver for her to engage in play with something already set up while I fed her little sister or prepared breakfast.
Providing open ended play materials allows children the opportunity to be curious, creative and direct their own play. There are no rules or expectations for how a play item must be used, no specific steps to follow, no right or wrong way, no ultimate goal to reach or achieve.
An environment filled with safe, yet challenging open ended materials that provide ongoing opportunities for open ended play in the early years is vitally important. It encourages dramatic play, language skills, role play, problem solving, teamwork, games, experimenting with cause and effect, trial and error and builds creative thinking. It is also a very budget friendly way for educators and parents to provide play resources as simple is best and you can use many recycled materials.
What are open ended play materials?
So what are these magical open ended play materials that can offer all of those wonderful learning outcomes? To put it very simply they are basically just materials you might introduce that have no specific set of directions to follow. There is no particular right or wrong way to use them and they can be used alone or combined with other materials.
Unlike the electronic toy or game that might do a couple of set things when you press the buttons or the train that only goes around the track in a circle a child can decide how they want to manipulate the open ended material and build upon their own play. They become the scientists, engineers, inventors, artists, explorers and clever investigators.
Children of all ages can move, carry, redesign, recreate and combine open ended materials in any way that they want. They might decide to work alone with the materials or in a group and essentially, children become active participants in their own learning. Offering access to these type of materials everyday also supports children's early years schemas – those patterns and repeated behaviours children display often as they learn through their play.
Open ended materials have always formed a core part of my planning and experiences offered to children – both indoors and out and I've included photos of just some of the favourites throughout this post to help you visualise the possibilities of including more of these types of materials into your program or with your own children.
Open ended materials are sometimes also called loose parts and can encompass a wide variety of resources.They don't have to just be of natural origin, they can also be manufactured. They can be large (but moveable) or small. See the list at the end of this post for some ideas to get you started with your own collection. They don't ever need to be expensive!
One of the wonderful things about using these materials for educators – especially those working in mixed age group environments is that they are suitable for all ages as children will manipulate and use them in different ways according to their own specific ages and stages of development – they can also use them in different ways day after day!
Rather than the box of baby toys that usually becomes useless after a certain age, open ended materials continue to be flexible and offer increasing opportunities for creativity and open ended learning.
Why include them in the outdoor play environment?
Are open ended materials and loose parts only suitable for indoor classroom and play activities?Definitely not – they can play a huge role in outdoor early learning environments!
When we only provide an outdoor play area with fixed equipment we can inadvertently limit children's creativity, movements, urge to experiment and problem solve. I'm certainly not saying we shouldn't have fixed resources in our backyards and play areas as they play a role too but ideally there needs to be a balance of fixed and open ended movable materials. This doesn't need to be expensive as most open ended materials can be sourced for little or no cost so it becomes very cost effective for educators.
Educators have asked me how to add loose parts and open ended materials to their program planning so it doesn't look like their are ‘doing nothing'. Just because an activity or play experience isn't planned out in advance does not mean it cannot be included in some way on your plan. You can easily incorporate open ended play and materials into your planning by simply listing some of the materials you have made available for the children to choose from that week then follow up with some brief reflections and observations about how the children used the materials and what learning you saw evolve through this play.
You might write this in a diary or even on the back of your program – keep it simple and to the point and make sure any observations (group or individual) that you record are meaningful and stand out to you for some reason.
I still like to have some intentional teaching experiences and craft activities planned on my program but open ended materials and play also forms an important part of my documentation and the plan evolves as the week proceeds.
When we include open ended materials or loose parts in the outdoor play environment it allows children to take a few risks, challenge themselves and feel as though they have some control of their environment. They can extend their own play, explore, carry, take materials apart and put them back together, rearrange to suit their needs, work out how to move heavy materials …they decide on how the materials will be used.
It can be fascinating for adults to watch and provides numerous opportunities to observe and document the many learning outcomes that are being achieved.
Even with small spaces and little storage space you can find creative ways to introduce larger loose parts into the outdoor play environment. For more inspiration take a look at the children playing here on Stimulating Learning with Rachel. So much creativity, building and thinking happening with those fabulous loose parts!
How to get started using open ended play materials in the outdoor area.
Although the term ‘loose parts' seems to be a bit of a catchphrase in early childhood at the moment it is not new and we were incorporating these open ended materials into play when I first began in childcare 30 years ago. So it's not something that should overwhelm you – introducing open ended materials into your early learning program will actually make your job easier, allow you to spend less on resources and equipment and provide moments for you to step back and observe rather than spending every minute planning and directing the play.
So how can you get started? My advice is to start small and just make a few changes at a time until you feel more confident in how to use and present access to the materials.
Aim to build a loose parts/materials resource shelf/tub over time
Begin writing a loose parts wishlist and think about ways you might be able to source those materials and involve families in your hunt too.
Build your collection from visits to parks, beaches, bushwalks, recycling centres, op shops, markets, garage sales, $2 shops, asking family and friends, treelopping and mulching services, local council, reusing packaging materials.
Keep in mind that offering open ended materials to your children might actually involve a little trial and error depending on the ages you have in care and the materials you have decided to use. Some things will work one day yet not the next – don't give up!
You can still use open ended materials to set up some basic invitations to play if you enjoy doing that – just don't direct the play if they decide to take it in another direction! Stand back and see what they decide to do with what you have set up. See your invitation as merely a launchpad.
Make sure you are available in the outdoor environment to provide support and help solve problems if the children need and request it. Encourage discussions – how else might they use the materials? What might they need to continue with their project?
Decide on a storage solution. I like to keep open ended materials for outside play stored in baskets in a small shed in the yard. I've also used baskets hanging on fences that stay out in the weather and small pots nailed to walls at the children's level and filled with loose parts that are always accessible. Use what you have available and try to keep organised so you know what you have available. Think about what you will have available this week and what you might need to change. Is there some fixed equipment you might be able to do away with to make more storage space instead?
Be aware at all times of safety precautions all educators should take in regard to using materials including possible allergies and choking hazards.
And finally (this is a hard one for many of us!) allow opportunities for the outdoor space to look ‘messier' and less ‘arranged' than you might be used to. I know this can be more difficult if you are a family day care educator using your family backyard but even if you can leave the materials for a day or two so the children can keep returning to their play and projects it will be valuable. Ask yourself if everything really needs to be packed away at the end of the day or are there some things that could be left out ‘ready to play' tomorrow?
INVITATIONS TO PLAY CAN BEGIN WITH A MUD KITCHEN OR SINK!
Shared by: (working clockwise from top left corner)
I hope you are feeling inspired to begin incorporating more open-ended materials into your outdoor environment to increase the opportunities for open-ended play, exploration and discovery.
NATURE PLAY IDEAS FOR KIDS!
August 15, 2016
Here are 60 amazing ideas for exploring nature with your child through play, art and investigation!
I recently gave a talk at a nature play group, in the middle of the woods, about activities to do with your child that involve natural resources and that encourage interaction with the natural world. Here are those ideas that I gave in that talk, plus many more, with links to some fabulous articles from some talented writers around the web!
For the days that you can’t get outdoors and explore nature first hand, go and gather some natural materials from your local woods, fields or beach and gets creative at home! Bring the nature home and let the connection with the natural world continue whatever the weather.
INVITATIONS THAT HELP CHILDREN EXPLORE NATURE, LIFECYCLES AND ANIMALS BIG AND SMALL.
Shared by: (working clockwise from top left corner)
Ronnie's Preschool
Narieta Tinaikulabu
Dolores Fitzpatrick
Kelly Marie
Shared by: (working clockwise from top left corner)
Christine Walker
Tennille Zammit from Little Ted Family Day Care
Leesa Maree
Kelly Marie
Shared by: (working clockwise from top left corner)
Renata's Family Day Care.
Joanne Wooding
Ronnie's Preschool
Tonia Bartels
Shared by community members (working clockwise from top left corner)
Christine Walker
Frosyni Magkafaki
Renata's Family Day Care.
Karina Dell
Shared by: (working clockwise from top left corner)
Fiona Power
Divina Guerrera
Renata's Family Day Care.
Renata's Family Day Care.
A fantastic nature-based invitation to play and create shared by community member Renata from Renata's Family Day Care.
30 Plus Ways to Approach Loose Parts Play!
The term “loose parts” has grown in popularity recently as educators and parents have rediscovered this timeless approach to play. Loose parts play can be as simple as finding a stick and using it in play or it can take a more complex approach to open ended landscapes. The term “loose parts” became popular with the Theory of Loose Parts by Simon Nicholson. He advocated for movable items in outdoor play settings in his work as a landscape architecture. Today, the term is fairly ambiguous with some guiding principles: open ended materials and lots of options. See a post about quotes about loose parts here and the basic premise and resources here.
While the guiding principles remain consistent, there are many ways to approach loose parts play. I choose to take a more inclusive approach allowing for different interpretations and applications of the term, as it is rather “squishy”. Some of these may overlap but I found them unique enough to list separately. Here we go!
Treasure Baskets—A well curated basket is perfect for infants and toddlers. Think of textures, safety, and opportunities for exploration. Scarves, textured fabrics, mouthable wooden blocks and other items, large, smooth shells, etc. are great additions.
Small World Play—Create a miniature world with lots of loose parts. This might be a specific habitat of local animals, a fairy garden, or other miniature type world.
Faces—Faces can be made in so many ways! We make them out of clay on trees, draw a circle on concrete and use natural items, or use found items inside a frame or a circle. Try the books Let’s Make Faces with this approach. Seriously, the sky is the limit with making faces with loose parts!
Ramps & Balls—We love ramps and balls as it allows so much STEM exploration and it’s just plain fun! I watch gown adults and older children making more complex configurations. See how we made our own ramps here.
Blocks and Add Ons—Blocks are a standard loose part. I like adding more elements to the mix and non-standard options to extend the play. We often have bins of acorn caps, shells, sticks, walnut shells, and other items near the block area for additional play opportunities. Read my post about block play here.
Playdough/Clay—Playdough and clay are such a great base material for molding, stamping impressions, building, connecting, and experimenting with textures. Both playdough and clay have a unique feel. There are many recipes available for playdough; we like this one. Clay is such a neat natural substance. We enjoy using clay to make “faces” with natural elements on trees outside. My 10-year-old son makes and sells play dough and loose parts kits at Pop Up Handicrafts locally. Look for nature.play.dough.
Sensory Bins/Experiences—Sensory bins can be a shallow tub, a dishpan, a pie plate, or a larger sensory bin in a school setting. While they can be filled with any loose parts, here is a simple “formula” that can be followed. The possibilities are endless! Sensory experiences may include playing with pea gravel, sifting hands through sand or soil, etc.
“Junk” Jars and Junk Play—Loose parts play can be as simple as allowing children to interact with “junk” in their own way. You may do this by collecting junk in a big jar. Junk could be unneeded items, extra screws, netting from oranges, scrap wood or fabric, etc. Larger “junk” could be leftover building materials old tubes, etc. Children can create and build with the materials. This would be a classic of how we grew up scavenging for junk in abandoned lots or similar to the storyline of Roxaboxen.
Adventure Playgrounds—Playgrounds full of loose parts are popping up various places such as The Anarchy Zone in New York, designed by Rusty Keeler. Think of the junk jars and junk play with a permanent place with a little more adventurous offering. Trained playworkers staff the space. Find playwork training at Pop Up Adventure Play.
Pop Up Play—Pop Up Play can be similar to junk play or adventure playgrounds; however, it is typically for a short time period, such as a special event or weekend. Pop Up Adventure Play has a great resource on how to set up pop up play in your area--find it here, with volunteer training and checklists here, and mini kit here. Gather staple materials, get the word out, use simple training with the adults, and have fun playing!
Build It or Loose Parts Parties—Have a party on a specific loose parts theme. Loose parts play can also be incorporated into just about any type of celebration or party. Whether it is having loose parts out as a centerpiece that people can play with, having specific open-ended play opportunities, or having a whole Build It party, play is meant to be a part of celebrations and parties. Here is an example of using loose parts in a pirate themed party, a fairy/wild thing party, and International Mud Day.
Seasonal Activities--Loose parts can be a great addition to holiday parties or seasonal activities. Read about loose parts with Valentine's Day, Halloween, etc.
OutdoorClassrooms—Having specific spaces set aside or outdoor play can be very beneficial. In the outdoor classrooms I have developed, loose parts are the “layers” that make the outdoor space work with space
LooseParts Toys—Some toys are more opened ended and have a loose parts vibe. Check out my list here. Think magnetic blocks, moveable marble runs, fort kits, etc. If Grandma insists on buying a birthday present, send her this list!
Grab& Go Kits—Create small bags that easily can be taken to use while out and about, waiting for dinner at a restaurant, during quiet time, etc. See some examples here. Here is another example of a robot tinkering kit.
Curated Collections—There are so many beautiful trays and carefully created collections for loose parts play. There is intentional design in choosing items that work well together. Nora Ryska’s work at Montessori Restore or the Loose Parts and Loose Parts 2 (aff links) books by Beloglovsky and Daly are good examples of this.
NatureArt/Land Art—Several great artists, such as Chelsey Bahe, Patrick Dougherty, and Andy Goldsworthy. Natural materials are used with artistic elements to create nature play scenes, whimsical stick creations, and just for the moment nature art. Mandalas are a fun and easy way to explore loose parts!
Found Objects—Sometimes you just “find” stuff to create with. This can be wood scraps, boxes, plastic cups—really, anything!
Classroom Project and Sort— As shared in the book, Beautiful Stuff (aff link), some classrooms have sent each child home with a bag to fill with loose parts. The bags come back in, the students discover the many treasures, talk about ways to sort them, categorize them all, and then use them as part of their creations and play.
“Station”, Areas, Zones—Many classrooms, both inside and out, divide the area into different areas or zones. Loose parts may be unique for each area, such as rocks, dishes, spoons, pinecones, water, mud, and herbs in a mud kitchen outside. Stations can also be set up with specific loose part invitation.
Part of Décor—One way we have incorporated loose parts is just part of the décor. Think of colorful scarves hanging from hooks or a zen sand garden with manipulatives. This last Christmas we had a printing tray filled with loose parts and holiday baubles. Everyone around the table interacted with the loose parts before and after dinner as well as during down times while the materials were out.
Invitations /Provocations/Activity—Some people separate these terms out, but I find they are largely similar. A collection of loose parts might be presented in a divided tray with mirrors, frames, or an “invitation” to play with the items. Here are several examples.
Architecture—This could include fort building (inside and out), making stages, tents, rooms within rooms, interior design, etc. Thanks for broadening this category, Belle!
Cardboardand Cardboard boxes—Cardboard is plentiful and easily manipulated. The classic cardboard box is a great example of the diversity of how cardboard can be used. Not a Box is a great book to use in conjunction with this. See my post on using cardboard as a loose part here.
Challenges—Sometimes, especially as children are in older elementary and beyond, giving a somewhat loose, yet directed challenge may be needed to tie loose parts into a curriculum need. The materials are still open ended and there is a lot of freedom, but it may be using loose parts to create the Great Lakes, manipulative to show word problems, etc. In this example, children use loose parts to create wind born seeds that they tested in the wind tube.
Collections—Buttons, buttons, who has the buttons? Think button or nature collections. These are sorted, categorized, and used for building and creations. The books, Sort It Out and Grandma’s Button Box, are good books to go with this type of loose parts play.
Tinkering—One of my sons loves tinkering! He likes taking things apart and using them in other creations. Duct tape, wire, and paper are his best friends! Here is one example of a robot tinkering kit. Rosie Revere Engineer and The Most Magnificent Thing are great books to pair with this.
Spontaneous—Sometimes loose parts play is totally spontaneous when we find things while out and about and use it as play. For example, my children turned a receipt and wind from their breathing into a game while waiting for dinner one time. We take advantage of those moments by having a loose parts mind set.
Obstacle Courses—We love child made obstacles courses. These can be made with natural elements in the yard and rearranged infinite numbers of times. We have a couple of large bins full of random things, such as pool noodles, crates, wooden planks, hula hoops, traffic cones, rope, and more. We pull these out as additions for obstacle courses that will be different each time we use these loose parts.
Extensions of Learning—Sometimes, loose parts may be used in conjunction with more formal learning. We made loose parts woodpeckers which morphed into cavity houses and other creations. We might also extend literacy connections into our loose parts play.
Scavenger Hunt—When we were studying eggs, we went on a loose parts egg hunt. Each egg was filled with various loose parts, in this case natural. Next year try an Egg Hunt for Easter with other loose parts. Specific hunts for loose parts items can also be a fun way to explore the space, such as finding 5 rocks, 3 leaves, 6 sticks, etc. and then making a creation out of them. Children could even make their own loose parts scavenger hunts.
Natural—Nature provides so many opportunities for loose parts play! We might stack rocks while on a hike, build a stick “fort” near a downed log, draw in the sand, etc. Read about seeds as loose parts or discovering loose parts while waiting on soccer practice.
SeniorPlay Trays—I love these loose parts trays designed for retirement homes. The open-ended options become spring boards for discussion and memories, offering engaging and sensory rich experiences for seniors.
Light Painting--We found this inspiration after watching The New Creatives. Basically use a light source like a flashlight or wand and use a prolonged exposure on a camera to capture the "trace of the light. It's addicting and fascinating to experiment with light! Other "light play" may include light tables, overhead projectors, shadow play, etc.
Magnetism--There are many magnetic "loose parts toys" we enjoy, however, we also like to explore magnetism through iron filings, a variety of magnets, ferrofluid, and magnetic slime. Read about our experiences here. Great way to explore loose parts with the older crowd. To me, it also models how exploring items and properties of materials can be a part of loose parts play within elementary school and higher before buckling down with designing an experiment and such. We need time for discovery.
How to Make Sensory Bins with Child’s Toys
What if I told you that you can get more use out of the toys you have at home while also encouraging your child to explore, use their imagination, work on their fine motor skills and allow them to play independently for longer periods of times? In this blog post, I am going to show you how you can create sensory bins with existing toys you have at home. As with all activities posted on this website, parental supervision is required.
Sensory Bins
My children LOVE sensory bins and can play with one for hours and hours. You can see more sensory box and sensory table ideas here.
How to make sensory bins
Imagine your child’s excitement when they see a surprise play set. Not only does this encourage creative play, you will be amazed by that huge look of surprise and happiness on your child’s face when they see it for the first time.
It really is very easy to create a sensory bin.
Step 1: Choose a sensory bin theme.
Look at the toys you have at home, is there a common theme?
Sensory Bin Theme Ideas
Colors
Shapes
Pirates
Faries
Dinosaurs
Cars and Trucks
Airplanes
Ocean
In this step you will also decide what size tub you would like to use. In this blog post I used this large storage tote and will include a link to my toy choices.
In the first sensory bin, I chose to go with a dinosaur theme. I chose to use the dinosaurs from the Dinosaur Adventure Backpack.
If you haven’t seen this toy before, check it out. I chose it because I knew that my daughter would find endless play opportunities with this. I also like having the ability to take this toy on the go when we are waiting for her sister to finish her gymnastics classes.
Step 2: Choose what you want the base filler to be.
You have so many options on a base depending on how messy you would like it to be. Also consider how long you want the sensory bin to last. Edible base ideas will only last one day, whereas non-edibles can last for months! Also consider your child’s age. If you have a young child that still puts things in their mouth make sure to use safe items. Edible base’s would be perfect for this.
Today, I opted to use rice and to color it green. I did this the day before I wanted to create the actual sensory bin. To create the rice I used the cheapest 10 pound bag of rice that I could find. We aren’t going to eat it, so it really doesn’t matter what type you purchase.
To color the rice you follow the basic recipe of: 1 cup of rice, 1 tsp of vinegar and add in your food coloring. Mix it then lay it out to dry.
Why I love using green rice as a base:
It acts as grass.
It is versatile because it can be used for a large variety of different sensory bin play sets
It creates minimal mess and is easy to clean up.
It can last for years. Just place it the rice in a closed container so that you can reuse it the next time you want to create a similar sensory bin.
Step 3: Choose tools for your child to use in the bin.
Children love pouring, scooping and playing with the items in the sensory bin. I normally add in funnels, play cups, colanders, spoons and other items we have at home.
I especially love Lakeshore’s Little Hands Fine Motor Tools. They are created in a way that help build fine motor skills and strengthen your child’s hands and fingers. That is one of my favorite things about Lakeshore Learning. They create toys that are not only fun to use, but have an added educational aspect to it.
Whatever tools you buy can be used over and over in future sensory bins.
Step 4: Put it all together.
Ta-daa! Doesn’t it look amazing?! The hardest part was just choosing the toys… but once you have the tools at home you can create this in under 5 minutes.
Dinosaur Sensory Bin
Fairy Sensory Bin
After my daughter played with the Dinosaur bin for a few days, I decided to change it up. I swapped out the dinosaurs for the adorable Fairy Land Play Set and when she saw it I got that amazing happy smile again! She feels so special when I create these bins for her… little did she know that it took me less than a minute to swap these toys out!
We have a simple rule at home, “If you want Mom to create sensory bins then the rice needs to stay inside the bin. If it goes outside, it is your job to clean it.” She likes the bins so she does a great job of cleaning up as best as she can. The mess is minimal and I love seeing her take responsibility for her activity.
She loved the size of the bin so much that she jumped inside of it. Now she was exploring the tub with her whole body. This bin stimulated her four of her five senses: Touch, smell, sight and hearing (the sound as the rice was sprinkled and fell.)
Don’t forget to have something nearby.. that your child can climb and jump on.At a preschool age, children can only sit still for a while before they need to burn off some more energy. Their body needs movement.
My daughter really loves Lakeshore’s Super-Safe Froggy Jumper. She is naturally a very active child and is constantly in motion. This jumper allows her to jump around in a contained spot. She uses the jumper every single day.
I hope you enjoyed this post on how to create sensory bins. Have you created sensory bins with your child?
I am so thrilled that many of you purchased your first set of Unit Blocks over the holidays for your little ones. They are certainly an investment, so I want to make sure that your children are actually using them!! Here is a simple guide to encouraging block play at home or in your classroom. Three simple steps. If you decide to follow them, let me know what works and what does not.
BLOCK PLAY SIMPLIFIED:
Define Your Space
Organize The Materials
Hang Out With Your Blocks
DEFINE YOUR SPACE:
Walk out of the room where your blocks live and then walk back in. What is the first thing you feel when you walk into the room? Is there a designated space for block play? How is that space defined? Is the flooring sturdy and even or is it a shag carpet?
My first bit of advice is to move some things around to make a designated area for building. There are two reasons for this. One, it shows your child that you value block play. By creating a physical space designed for building, you are helping your child to focus on creating without distraction from his or her thoughts. Think of it like this.. Do you have a designated space where you work? Maybe a desk or a table that holds your computer, important documents, and some reference books? It's easier than just plopping down in the middle of a chaotic, messy room and pulling out your computer, right? Same thing with building and playing.
This space does not have to be spacious, just make sure it's big enough for your child to move around and build without getting in her own way. If there are little siblings in the picture, it might help to put this space in an area that is protected from unsteady toddlers or speed crawlers. Maybe you could put a small block shelf in your child's bedroom or perhaps in an area of the house that his little sibling cannot access. (My sister put her block area in an enclosed pen to keep the little ones out and the builders building! Genius.).
ORGANIZE YOUR MATERIALS:
How do you store your blocks? Are they all dumped into a bin, stuffed behind the trucks and puzzles? You are not alone. Pull them out and sort them by shape. Your child can help you or you can grab a coffee and go it alone while listening to an awesome podcast. I'd go the podcast route, but that's me.
Once you have them sorted by shape, decide on a shelving system. My father-in-law built us a custom shelf to house our blocks, but then again, I am the crazy block-lady. You can use a shelf designed for blocks like this one, but these shelves are super pricey and any shelf system that you already have will do. Better yet, check out your local facebook SWAP sites. Get an IKEA hand me down. However you decide to obtain a shelf, just get one. Trust me, it makes all the difference in the world in how your child will use the blocks.
When you have your shelf in place, lay out the blocks according to shape and size. You can organize them in a manner that makes sense for you and your child. I try to make sure the larger, heavier blocks are on the bottom, but I'm not sure it really matters. The most important thing is that each shape is visually represented and can be easily accessed by the child.
HANG OUT WITH YOUR BLOCKS:
Alright! The hard part is over and all the really great learning and engagement is about to happen. Invite your child into the space that you have created. Show her how you've arranged the materials. Ask her what she might build? Will it be a house for stuffed animals or a parking garage for her race cars? Will she build flat or will her building be tall?
With reluctant builders, I might 'pre-build.' That means I might lay out a very simple structure and ask the child how he can add to it. Then follow his lead. He adds a rectangle, you do the same. Try to mirror their block building behavior. Once they get going, you can slowly step back and let them go. Remain interested, but do your own thing. You want to encourage independent play.
When I notice my children haven't been building a lot, I do one thing and it works EVERY TIME. I sit in our block area. I just sit there quietly and read on my phone or read a book to them. They usually want to go wherever I am. If I am in our block area, that's where they will be. If those blocks are organized and displayed in an inviting fashion, they can't resist them. And that, my friends, that's where the magic happens.
Here is some language you might hear me using to encourage block play.
Which shapes will you use first?
How can you use these squares to make a long, flat line? How can you use them to make a tall, standing up line?
Which blocks would make a sturdy base for your buiding?
How can you make a house for your lovey? Will it be tall or will it be down low? Will it have a roof or a door or will it be open?
Can you make a pattern using the blocks?
Which block do you like? What do you like about it? How can you use it in a building?
MORE TIPS TO ENCOURAGE BLOCK PLAY
Snap photos of your child's block building on your phone. Print them out and bind them together with a binder ring and a hole puncher.
Hang the photos around the block area to inspire your child.
Add a small basket of people and a small basket of cars to the block area. See how it changes the play.
Encourage your child to make signs for his or her buildings with a basket containing small pencil and papers. Just remind them not to write on the blocks.
I could write about the benefits of block play and how to encourage block play for hours and hours. Do you want to pick my brain? I want to know WHAT you all need help with when using blocks in your home or classroom. Leave me all your questions in the comments below and I will answer them.
Open Ended Block Play
In the ten years I taught preschool, the block corner was always a popular place in my classroom. All of my big kids loved block corner, and now my smallest also adores the fabulous block corner at the preschool he goes to. When I ask Noah what he has done at kinder (preschool) he always answers “bwocks and puzzles.”
We don’t have the space for a dedicated block corner at home, nor can we afford the fabulous big sets of unit blocks, hollow blocks and all the fabulous accessories they have at kinder, but that doesn’t mean we can’t enjoy block play at home.
The Best Toys for Block Play at Home
Over the years we have bought some lovely commercially made blocks and construction toys, but we have also made or collected many other great items to include in block play. One of the priorities with the toys we select is that they have to be open-ended (they can be used in a variety of ways), good value for money (or better yet, free) and we have to be able to store them. All the items we use for block play fit these three ideals.
Homemade Blocks from Scraps
I made some simple castle blocks a long time ago out of scraps of wood from a building site. Over the years we have added more scrap wooden blocks, including some we made into chalk board blocks. It’s easy to find soft pine off cuts at many house building sites and all you need is a little sand paper to round the edges and they make perfect blocks.
Natural Materials
There are so many natural materials that you can collect to add to your block play – pine cones, stones, acorns, gum nuts, seed pods, sticks, and much more. Keep your eye out when you are out and about and start a collection of interesting natural materials.
Homemade Tree Blocks
If you are handy with a saw, then it is easy to make some homemade tree blocks. Just saw slices through branches and then sand smooth.
Tree Slices and Slabs
You’ll need a bigger saw and some bigger pieces of wood to make these tree slices and slabs but if you know someone who has an open fire you could surely steal a log or two of fire wood to slice up.
Recyclables
This is the cheapest and easiest way to add all kinds of construction materials to your block play. There are so many recycled items that are fabulous for block play, we’ve only collected a few. Here’s some ideas – tin cans (make sure you use a tin opener that leaves a smooth safe edge on your cans), cardboard tubes, pieces of cardboard, small boxes, meat trays, plastic containers, old CDs.
Small Wooden Block Set
We may not have the space or the budget for a big set of unit blocks but many of the same mathematical concepts of size and shape, can be experienced with a small set of wooden blocks that don’t cost the earth. We asked family for this set of blocks for our twins’ first birthday ten years ago, and they are still loved all these years later.
Turned Wooden Blocks
We are very lucky to have a grandfather who makes these lovely turned wooden blocks for us. We also have lots of off-cuts and left overs from his wood turning that are fabulous to build with. If you know a wood turner or there is a local workshop near you, ask them if they can collect the scraps and mistakes for you.
Loose Parts
You can add almost any loose parts to block play to make it really take off. All the little accessories and extras really spark a child’s imagination and often add extra opportunities for learning. We only added a handful of things that we had on hand – our free printable hexi cards, some glass gems, fabric scraps, plastic bottle caps and lids, and pompoms. Here is some more inspiration and ideas for loose parts from Learn With Play At Home.
Animals and People
Because we love imaginative play, my kids often add animals or people to their play. At the moment we have an odd collection of animals and and even more odd collection of people including a prince, a wizard, some fairies and some animal warriors! You could also add cars and road signs, or even use some of our free printable space accessories.
Tips for Block Play At Home
Find some storage that the kids can easily access and easily pack away.
We use two Ikea Trofast units in our family room, and the kids can easily drag the tubs to where they want to play. It is also easy to change the contents of tubs, so when we are ready to have a break from block play we can pack the blocks into storage and add something new.
You need a BIG space for block play.
Our kids roll back the rug and build on our wood floors, or on our big dining room table. If you have carpet you might like to buy some big wooden boards for your kids to build on, or a train table also works well.
Add some writing and drawing.
Adding some pencils or markers and paper opens up a whole world of literacy learning. Kids love to add signs for their block constructions, and even a child who is not writing yet can dictate a sign to you and see the power of words in action.
What They Are Learning.
Block play is lots of fun, but is it really so important? Is it worth going to such an effort to collect blocks and accessories?
I think it is and here are just some of the things kids learn when they play with blocks:
Maths skills such as – number, shape, size, weight, volume, grouping, sorting, patterns, and measurements.
Physical skills such as – eye-hand coordination, spatial awareness, large and small muscle movements, and visual perceptions.
Science skills such as – experimentation, planning, cause and effect, balance, gravity, and symmetry.
Literacy skills such as – expressive language, vocabulary, pre-writing skills, and seeing words in action.
Creativity such as – representing ideas, using imagination, story telling, taking on roles.
Social and emotional learning such as – problem solving, co-operating with others, negotiating, feeling successful, working through failure
And an added bonus – my almost four year old built blocks for more than an hour today. That was an hour that he didn’t ask what he could do, or for food, the only thing he needed from me was a few signs written up, so that was an hour I had pretty much to myself!
And don’t forget, block play is not only for toddlers and preschoolers – my school kids all still love creating elaborate block constructions and they are still learning and practicing all those skills listed above.
So after all that… have I convinced you that block play is not just for preschool? Have a go at some block play at your place and see where it takes you!
HOW TO CREATE AN INVITATION TO PLAY OR A PLAY PROMPT
What is an invitation to play?
An invitation to play is simply a collection of resources/materials set up together which encourages children to learn through play and explore the resources that are offered to them.
The process of laying out an invitation allows children to be creative and the play that comes from it is not directed by an adult.
Try to think of an invitation as a prompt for children to play in a different way that they may not have tried before. They can use their imagination to extend on the invitation however they please.
There is no right or wrong way for the child to engage with the materials offered and they are an easy, simple way to get children playing creatively and independently.
Where should I set it up?
They are best set up at a table at your child’s height or on the floor depending on the size of the resources and how you think they might use them.
Invitations are a great way to get children to play with resources that they may not have taken off their shelf in a while! A play prompt can be really simple. It can be as simple as just setting out certain toys.
Ada plays in both her room upstairs and the living room downstairs. So they have a "Yes Basket" instead of "Yes Space". Yes spaces contain all very safe toys that allow for a variety of playful experiences. My sister babysits two days a week. She selects open ended toys that she can create a theme for play. Then puts the big basket out of reach on the table. Then prompts the theme to start the playtime wherever Ada is. Ada has a favorite scrunchie toy. That my sister uses to help stretch her focus and attention. Teachable moments are woven into the playful experience quite naturally.
Ada's other grandma lets her play with everything in the basket, but sits back as Ada plays on her own. Creativity and independant thinking abounds as she plays and entertains herself as she scatters the toys about. Who's right? They both are. It is great that they approach play differently. It gives Ada more than one kind of playful experiences. There are many ways to play with open ended toys.
What can I create an invitation to play with?
You can offer an invitation to your child with anything you already own using existing resources, recycled or bought. I find that open ended toys and loose parts always seem to lead to the most play with my kids!
If you would like to read more about open ended play have a read of another one of my blogs, ‘Engaging in Open Ended Play.’
Where to start?
Now the most daunting part is getting started and worrying if you’ve done it right but I’ll tell you that it's not hard!
Start by watching your children and creating an invitation around their interests. For example, if your child is enjoying pushing vehicles around the house a great invitation would be laying out something to push the cars on such as Waytoplay roads, Building Boards or Connetix. Place the cars in a basket beside them or join just a few pieces together and put a car on top.
Gather resources from around your home (toys and household items)
Keep it simple
Leave room for your child's imagination
Place resources together at your child’s level
Photo by @ulipekstyle
How to create an Invitation to play
Start by selecting a few resources that work well together or by taking an activity apart such as a puzzle. Take all the pieces out of the puzzle and put them in a basket or wrap the pieces up to make the activity a bit harder.
Take the resources off the shelf and put them on a low table or on the floor together.
Let your children play with the invitation however they would like, try not to tell them what to do or how to do it and let them enjoy the resources by exploring and using them however they please!
I try not to tell my children what to do or how it could be used unless they ask me. I try to get them to lead them and get them to use their own imagination and curiosity.
Some children need a bit of help when engaging in invitations to play and open ended play at first and they may want or need you to give them some ideas or guidance and that’s okay! Sit with them and play beside or with them to try and encourage some different ways to play.
If they do ask for some ideas I would say "Could these be flowers in a garden? Maybe you could line them all up? Have a play and let’s see what you can create!" Another great way is to prompt them to say “I’m trying to make the sea, can you find me some water?” They are then more likely to use their imagination to find a solution.
As children become more experienced with open ended play you may find that they will start to combine their play with other resources around them past the invitation and extend the time that they are playing.
How long should it take to set up
The simplest invitations always lead to the most play as they leave a lot of room for the child's imagination. Mine usually take under a minute to set up and any play that is enjoyed past the set up time is a winner!
Depending on the age of your child their attention span will vary but on average a child will engage in an activity for 2-4 minutes for each year of their age. For example a 2 year old would be 4-8 minutes.
Of course every child is different and some may play for longer or shorter.
How often can you create an invitation?
I first began creating invitations when my eldest was about 9/10 months old with simple items such as a posting box or bowls to transfer objects between.
I used them most when my eldest was about 18 months old when I was heavily pregnant with my second. This was great for her to learn how to engage in them before the birth of her sister and then I used them when I was breastfeeding or busy settling the baby!
At this stage I would use them about 3 times a day but as she grew older and was more patient with me and her sister I didn’t need them as much. I would often still create one in the morning for her to wake up to which always bought me a bit of time to get myself and the baby dressed before we got on with the day.
You can also use invitations to assist children in building their independent play to engage them at an activity whilst you step away for a few minutes to cook dinner or do the dishes.
My children are now 3 and 4 and we would be lucky to do one or two a week as they thoroughly enjoy free play but that’s the beauty of it - you can use them when it suits you and your family.
Sometimes my girls ask for something after rest time to ease back into the day and I will always provide that for them.
I should stress that an invitation to play should never be something you make a child do, it is still their choice as to whether they engage with it or not.
INVITATIONS TO PLAY that CREATE INTEREST AND ALLOW YOUNGER CHILDREN TO EASILY ENGAGE
Shared by: (working clockwise from top left corner)
Karina Dell
Renata Plesa Stipanovic
Christine Walker
Marina
Shared by: (working clockwise from top left corner)
Renata's Family Day Care.
Clare Louise
Georgia Glynn
Laurie Pal
Shared by: (working clockwise from top left corner)
Josie Sheehan
Jess Lawless
Julia Jeffs
Clare Louise – The Woodland Child
Shared by: (working clockwise from top left corner)
Debbie Wassell
Sally Mallett
Abigail Brown (she removed the drawers from a low cabinet and added easily accessible baskets instead!)
Robyn Jones (love the use of old bathtubs!!)
Shared by: (working clockwise from top left corner)
Renee Smith – Awabakal Preschool
Renata's Family Day Care.
Gail Fort (A Hairy Maclary invitation!)
Renata's Family Day Care.
Invitation to play ideas and inspiration
Ideas for mixed age groups or siblings that are similar but different levels in learning.
Setting up invitations to play (which of course leads to learning) can be a simple way to 'prompt' children to play in different ways with different materials. It can offer children the opportunity to direct their own play, follow their interests, learn more about the world around them, express themselves creatively and use their imagination to extend upon the initial invitation.
They truly offer so many possibilities for playful learning and that is why early childhood educators and parents have been using them for many years! But what are they exactly?
To simplify… invitations to play are really just a collection of materials (or props if that helps you to visualise) set up together with some thought and creativity behind the process. The aim is as the name suggests…to invite children to explore, investigate, create PLAY. They might be set up with intent of children exploring and understanding basic learning concepts or they might be set up with no specific learning outcome in mind. They might encourage further exploration of a current interest using different mediums or they might simply be fun and interesting.
The invitation to play might be large or small, indoors or outdoors, use many props or just a few, use natural or man made materials -how you COMBINE AND SET UP those materials is the important part! The aim is to plan for and provide an invitation that offers opportunities for multiple learning outcomes depending on how the children approach the space and materials.
No matter the intent of the setup, both perspectives ultimately allow for the child to direct the play in the way that they want to -even if it differs from the educator or parents initial concept or planning.It is for this reason that invitations to play work very well with the Reggio philosophy of allowing children to direct their own play by giving them access to open ended materials that encourage investigation, further exploration of current interests, curiosity and imagination.
The key to setting up invitations to play that engage (not just look pretty) is not a big resource budget, always using new materials or spending days getting it ‘just right' and then freaking out when the children actually touch it and ‘mess it up'….in reality it is about being intentional in your teaching but keeping it simple, hands on, child led and above all FUN!
15 Tips for Creating & Setting Up Invitations to Play
Stop using the excuse that you don't have a big budget for natural and quality resources -look again at what you DO have and think about how you might present or use them in different ways.
Begin sourcing and organising a collection of simple but meaningful materials to use together in your invitations. Op shops, markets and garage sales are a treasure trove of old items waiting to be reused in playful ways!
Think differently – When your collection begins to build and you store the materials with some organisation and purpose you will find it easier to get creative and think about how the materials might work together.
Try to use as many open ended resources as possible (see my previous post on loose parts here for some ideas and a free printable) but there is also nothing ‘wrong' with incorporating favourite toys and more generic play things – just keep them the minority not the majority (it's cheaper for you that way too!).
Observe the children at play, listen to their conversations, think about the questions they are asking then bring that information to your planning and setup of invitations.
Use clearly defined spaces to set up your materials – this doesn't have to be a table, it might be simply a small tray, a few tubs together on the ground, a mat, the sandpit, the water play tub, a large rock, a shady spot under the trees….what will work best for both your invitation materials and the ages and developmental stages of the children? Remember to change around the areas you use to help keep boredom at bay.
Rotate toys often to spark interest and combine those that have been left in the corner unloved for quite a while with some open ended resources from your collection to reignite engagement.
Natural and sensory materials – Collect and use them whenever possible – aim to stimulate the use of senses, not just creative thinking.
Keep it age appropriate! Consider the materials that you feel are safe and appropriate for the children you currently have in your care. Think about how you could modify if you are doing Family Day Care with a mixed age group. If you are concerned about using the materials inappropriately – throwing to hurt, swallowing etc make sure to model, supervise and provide other options close by that you can redirect to if needed.
Be flexible – just because you set up an invitation to play doesn't mean all the children will want to do it -ensure you still plan for other play opportunities as well and don't force a child to participate if they are not interested.
Add to the play. If you have the space try to leave the invitation out for a few days before packing away so the children have time to go back and forth adding their own elements and letting the play evolve in different ways as different children engage with the materials on different days. Remember – it's not about perfection or snapping a great pic to get on your Instagram feed!
Less is usually more – try not to go overboard with the number of props you use!
Plan ahead – think about ways you can use that invitation in different ways by adding or taking away certain materials. How are the children playing? Reflect and keep notes so you can easily extend the play and save yourself some work!
Decide on the intention behind your invitation to playand what you would like to see. Is there something you are extending on? An interest you want to help the children explore? A learning concept you want to help clarify? An investigation they want to lead? To explore with their senses? To problem solve? To express themselves creatively? Always be open to the children taking their learning in a different direction though!
Collections & Props– consider the combinations and experiment with your invitation. Start with your basic open ended materials and interest toys (I call them the stage) then build from there with your additional ‘props'. Will you incorporate books related to the invitation, felt puppets, music, material, posters, photos, cards, drawing tools, sensory items? …and the list goes on.
I've grouped them into categories to help you think about the different ways you can plan for and use your invitations to play. This is a collection of table top invitations but you can use any surface that works for you !
Using invitations to play to invite creativity.
Shared by: (working clockwise from top left corner)
Melling Nursery
Ronnie's Preschool
Christina Nutter
Carlene Cox Newton
Shared by: (working clockwise from top left corner)
Jade Ken
Ruth Carlson
Ronnie's Preschool
Jess Lawless
Shared by: (working clockwise from top left corner)
Ronnie's Preschool
Renata's Family Day Care
Carlene Cox Newton
Tonia Bartels
Using invitations to play to offer intentional teaching moments.
Shared by: (working clockwise from top left corner)
Christine Walker
Val Hume
Tonia Bartels
Renee Smith – Awabakal Preschool
Shared by: (working clockwise from top left corner)
Renata's Family Day Care
Christine Walker
Renee Smith – Awabakal Preschool
Ronnie's Preschool
All 4 invitations in collages above and below shared by: Renata's Family Day Care.
Shared by: (working clockwise from top left corner)
Renata's Family Day Care.
Renata's Family Day Care.
Vivienne Varis
Jasmine Jones
Invite the imagination in with small world play.
Shared by: (working clockwise from top left corner)
Helen Garland
Tennille Zammit from Little Ted Family Day Care
Ronnie's Preschool
Belinda Bryce
Shared by: (working clockwise from top left corner)
Debbie Wassell (turned a spool into a pond…lots of possibilities with this as the ‘stage')
Val Hume
Lisa Rielly (A lazy Susan on the table – genius!)
Tonia Bartels
Shared by: (working clockwise from top left corner)
Kerry Mitchell
Suzanne Ross
Kristina Conner (exploring Ireland!)
Katrina Krogh
Shared by: (working clockwise from top left corner)
Jessica Watts
Kristina Conner (exploring Mexico!)
Sanjeewa Gunasekera
Anna Pummeroy (Raised platform using a light box)
Shared by: (working clockwise from top left corner)
Tamara Miller
Tennille Zammit from Little Ted Family Day Care
Anna Grebenshikoff
Jessica Watts
Engaging opportunities to play with open ended materials.
Shared by: Janelle Smith
Shared by: (working clockwise from top left corner)
Tamara Miller
Kristina Ramsay
Ronnie's Preschool
Shaun Banham
Shared by: (working clockwise from top left corner)
Ronnie's Preschool
Ronnie's Preschool
Renata's Family Day Care.
Renata's Family Day Care.
Shared by: (working clockwise from top left corner)
Inspire to Tinker
Jasmine Jones
Renata's Family Day Care.
Renata's Family Day Care.
Invitations to play that ignite the senses!
Shared by: (working clockwise from top left corner)
Tonia Bartels
Ronnie's Preschool
Heather Rolls
Ronnie's Preschool
Shared by community members (working clockwise from top left corner)
Renee Smith – Awabakal Preschool
Ronnie's Preschool
Belinda Bryce (fossil digging fun)
Renata's Family Day Care.
Shared by community members (working clockwise from top left corner)
Jasmine Jones
Renata's Family Day Care.
Renee Smith – Awabakal Preschool
Emily Vogler (DIY Sensory Table)
All 4 sensory invitations in collages above shared by community member Veronica from Ronnie's Preschool
Love those salt trays!
All 4 sensory invitations in collages above shared by community member Renata's Family Day Care.
Whew! That was a lot of photos! I certainly hope you have been inspired to begin collecting those materials, reusing what you already have and thinking about how you could set up your next invitation to play…and how the children might take the lead in their own learning.
I hope this blog has given you some inspiration for some invitations to play. There are so many more ways than just what I've shown, get creative and have fun!
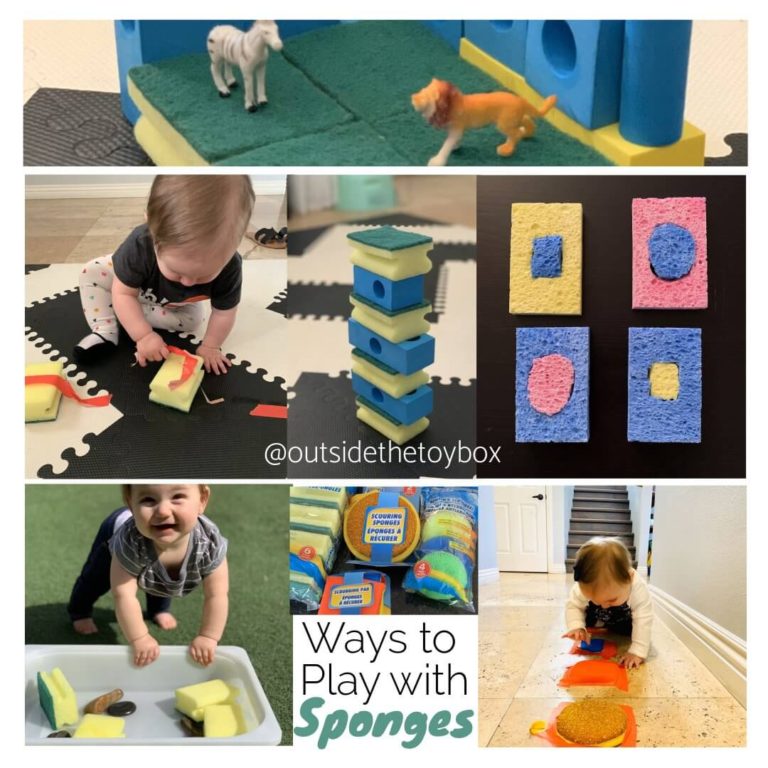
Who thinks of a simple sponge when they think of a really fun day with the kids? If I had little kids around in class or at home, I would have lots of sponges. Before you call me crazy, hear me out. I rarly live in town... or near a store. You can make a sponge into most anything for playtime. Spontaneous needs during open-ended and small world play can often be met by a versitile element like a sponge or playdough. I hated to fill water balloons, so we went through alot sponges in the summer. Plus the littles love frozen sponges no matter what shape that they come in when they are teething.
Why sponge play? 🧽 Sponges are soft, great for developing those little finger and hand muscles. We had fun squeezing the sponges to drain all the water. 🧽 Sponges are great for exploring textures and colors Add some bubbles and they make fabulous foam to play in.
Age recommendation: My little one was almost 6 months old here‼️ Remember adult supervision is always required during playtime.‼️
Discovering Sponges through Water Play
Whenever Buddy and I have fun with a messy activity, I like to have a water activity set up too. This naturally extends our play time and it means I get get him cleaned up without any protest – that’s a bonus on both counts!
Obviously it requires a bit more preparation to set up two plays at once, however I find it reduces tears and tantrums when the messy play is over and the clean up operation begins.
This one was beautifully simple to set up as we played in the wet room. We don’t have a bath in our house and the bucket he is playing with is actually his bath tub. Fortunately he loves bath time so he is always happy to play with his tub.
I set the tub up with a variety of household sponges in the corner of the room. Buddy didn’t even notice it until he grew bored with painting and began to explore other things in the room.
Play!
Buddy was excited to see his bath tub filled with objects. He cracked out a huge smile and plunged straight in.
As expected he fished out the cow sponge. He loves that thing and it is always a nightmare to prise it for his grasp at the end of bath time. He loves chewing it, engorging it with water and trying to drink it, waving it…. The list is endless.
He played with it for a good while before (finally) looking into the tub again. This time he located the big shower puff sponge.
He spent some time flapping it about and pulling at the netting. He has never touched this sponge before so it was fun to see him investigate it. He got soaking wet playing with the sponges but really enjoyed it!
Next I popped him in the tub to scrub up and to explore the other sponges. He enjoyed chewing on the scouring sponge, I think it felt nice against his sore gums.
He enjoyed touching the scouring pad and spent time scratching his nails through it. He seemed pretty impressed by the noise it made.
He then had a good prod at all of the cloths and sponges and enjoyed splashing them in the water, cleaning himself in the process!
This was a really fun way to clean up from an exciting messy play. Buddy had fun and we avoided all melt downs! Now I’m just biding my time until he can help me clean up the mess we make too!
Water Play with Sponges
We have had great fun with this water play with sponges activity. Water play activitesare always popular, especially in Summer. This one is an easy activity to set up for toddlers, and one they are sure to love! It provides simple unstructured play, and there are lots of options for adding toys and other manipulatives. One of these options is putting sponges in the water. With various colors, sizes and textures, sponges offer unique sensory play opportunities for kids. You can even buy sponges in fun shapes like these animal ones.
Kids are drawn to water play for the sheer fun of it: filling and emptying a cup,; squeezing a rubber toy; stirring with a wooden spoon. These are repetitive motions that a toddler can enjoy over and over while building fine motor strength. Water play can be soothing and calming, as well as a fun sensory experience.
A simple plastic bin is all that is required to start the fun. Water play with sponges may get a little messy so prepare the area ahead of time with a drop cloth (we love this one) and some towels for wiping up spills.
Add a variety of sponges, in different sizes, shapes and colors. These are usually found for little expense at a hardware or dollar store or on Amazon.
You can use the sponges as it or be creative and cut the sponges to resemble the shape of a boat or a fish. You can also add craft eyes or fins to a sponge to make a sea creature.
Engage your toddler with conversation and hands-on activities.
Show your child how to squeeze the sponge to release the water. Squeeze water over your hand and over the sponges and toys.
Practice filling a small bucket or bowl. Then pour the water out of the container.
Observe how sponges float.
Stack the sponges.
Sort the sponges by color, size or shape.
Place small toys on the sponges to see if they sink or float!
Kids often enjoy water play at bath time, or blowing bubbles outside on a sunny day, or washing dishes with a grownup.
At other times, it can be helpful to introduce water play in a plastic bin like the one in this activity, to increase engagement with developmental skills.
Sponges are a perfect addition to water play. With a variety of ways to use them, they provide a unique sensory experience your child will love.
Water play is an effective way to entertain a busy child! Make water play a routine part of your toddler’s learning experiences. If you enjoyed this water play with sponges activity, you can find lots more water play activities for babies and toddlers HERE.
10 Ways To Play With Sponges
I’m all about thinking frugally when coming up with toys and activities for my little one for several reasons. Obviously to save money, but also because often times we create these elaborate activities for our baby and then they couldn’t care less about the toy or activity. That or they spend one or two minutes and move on to the next thing. Why spend lots of money on something when you could find something at the dollar store that may or may not keep their attention? Also, having lots of ways to play with one item increases the likelihood of them finding something interesting, extends your dollar a bit further, and gives the added benefit of developing their creative and critical thinking skills.
Why Sponges?
Sponges are fun and can take many shapes and forms. The variety of textures, colors, shapes, density offers boundless opportunities for sensory play. Sensory play is so important for brain development. Basically, when children are allowed to explore their surroundings with all of their senses they can make more sense of their world and more synapses are created and connected in their brain. For example, if you have never felt anything wet before and someone said, “Touch this it’s wet” you may not make that connection in your brain and you wouldn’t know how to approach that scenario. If you have many experiences with things that are wet you may begin to connect the dots in your brain. You may still have questions, but at least you have a starting point and something to connect back to. If you want to read more about the importance of sensory play, read my post “What’s the Deal with Sensory Play?”
Here Are 10 Ways You Can Use Sponges In Your Play
1. With Water
Let’s start with an obvious one, water. Sponges and water go hand in hand. Try mixing it up though and add color to the water or make the water bubbly. Demonstrate different ways to use the sponge as you narrate what you are doing (ie. “Look, I’m going to get the sponge really wet. Now I’m going to hold it up high and squeeze, squeeze, squeeze. Look how the water is falling. Reminds me of rain…”). It’s also fun to have a variety of types of sponges in the water. Some may hold water better than the others. You can even add in scientific terms like “absorb” or “dense.”
2. With Cars
Adding cars with sponges can create opportunities for pretend play. They might build roads, tunnels, parking spots, garages, etc. for their cars. You may also want to do a car wash. Typically, children won’t build actual things and use props with their play until they are about 3 years old. Doesn’t mean you can’t play with cars and sponges when they are younger though. Your role will look different. You may be doing more modeling and narrating while they explore the items themselves when they are younger than 3. Watch to see what they are doing before you intervene and don’t force them to play a certain way.
3. With Animals
As with cars, adding animals to sponges can create opportunities for pretend play. You can now build beds, dens, nests, caves, and other animal homes with the sponges. You may also want to give the animals a bath so add them to some soapy water.
4. Create A Crawl/Walk Path
This activity is best for babies starting to crawl until they are walking toddlers. Finding a variety of sponges can make for some fun sensory experiences. Tape them to the floor and encourage your baby to crawl over them or next to them while feeling them. Your little one will likely stop to get a better feel and this can help them with balance and their motor skills.
5. Build Towers
One of my current favorite games with my 7 month old is how tall can I build this tower until she knocks it over. We do this with foam blocks, wooden blocks, and, hey, we can even do it with sponges. You can build with wet or dry sponges. Your toddler or preschooler might enjoy building the towers themselves, or may even come up with more complicated structures.
6. Help Clean
It’s never too young to get them started, am I right? This is another conventional use for the sponge, but can be very fun for babies, toddlers, and young children. Young children love to help out. You can “clean” just about anything. Maybe it’s time to clean their bikes and other outside toys…get the sponges out! Maybe they want to help clean the dishes…get the sponges out! Maybe the walls in the playroom need a little scrub…you get the idea. They don’t have to do a perfect job and you will probably have to do the real cleaning, but allowing the opportunity for them to help empowers them to feel like a contributing member of the family and teaches responsibility.
7. Make Puzzles
Cut your sponges into simple shapes and make them into puzzles. You can make more complex shapes depending on the developmental level of your child. You can also cut them into Tanagrams to build with.
8. Paint With Edible Paint Or Colored Water
Use the shapes you cut when making your sponge puzzles and then dip them into edible paint. An alternative to edible paint is non-toxic tempera or colored water. We used water with food coloring. When we painted with sponges I made sure to tape the paper down and I showed Miss 9 months how to stamp the paper with the sponge. Best part was when she inevitably put the sponge in her mouth, it was completely taste safe. You can stamp them onto paper or simply let the activity be a sensory process art experience.
9. Stick Them To The Window
Ok, I originally saw this idea from @Play_at_home_mummy on Instagram and ran to the dollar store to buy some sponges. While at the dollar store, I found some foam numbers and thought they might work like sponges on the window. Sure enough they did. My 7 month old loved grabbing the foam numbers and putting them directly into her mouth. This kept her busy long enough for me to empty the dishwasher. These are also really fun at bath time.
10. Dry/Wet Sensory Play
Mix up the wet sponge play by adding a few dry ones in the mix. Talking about the difference is a great way to create those neural pathways for a better understanding of the words and concepts of “wet” and “dry.” My 7 month old definitely prefered the wet ones though.
We have had great fun with this water play with sponges activity. Water play activitesare always popular, especially in Summer. This one is an easy activity to set up for toddlers, and one they are sure to love! It provides simple unstructured play, and there are lots of options for adding toys and other manipulatives. One of these options is putting sponges in the water. With various colors, sizes and textures, sponges offer unique sensory play opportunities for kids. You can even buy sponges in fun shapes like these animal ones.
Kids are drawn to water play for the sheer fun of it: filling and emptying a cup,; squeezing a rubber toy; stirring with a wooden spoon. These are repetitive motions that a toddler can enjoy over and over while building fine motor strength. Water play can be soothing and calming, as well as a fun sensory experience.
A simple plastic bin is all that is required to start the fun. Water play with sponges may get a little messy so prepare the area ahead of time with a drop cloth (we love this one) and some towels for wiping up spills.
Add a variety of sponges, in different sizes, shapes and colors. These are usually found for little expense at a hardware or dollar store or on Amazon.
You can use the sponges as it or be creative and cut the sponges to resemble the shape of a boat or a fish. You can also add craft eyes or fins to a sponge to make a sea creature.
Engage your toddler with conversation and hands-on activities.
Show your child how to squeeze the sponge to release the water. Squeeze water over your hand and over the sponges and toys.
Practice filling a small bucket or bowl. Then pour the water out of the container.
Observe how sponges float.
Stack the sponges.
Sort the sponges by color, size or shape.
Place small toys on the sponges to see if they sink or float!
Kids often enjoy water play at bath time, or blowing bubbles outside on a sunny day, or washing dishes with a grownup.
At other times, it can be helpful to introduce water play in a plastic bin like the one in this activity, to increase engagement with developmental skills.
Sponges are a perfect addition to water play. With a variety of ways to use them, they provide a unique sensory experience your child will love.
The beauty of having multiple ideas in your “toolbox” is that not every child is the same or is engaged with the same experiences. Also, developmental levels can affect a child’s engagement level. Try an activity one day with no interest at all and the next week they can play for hours…ok, let’s be real for at least several minutes. Plus, babies and young children have about a millisecond attention span so you may even decide to do all of these activities on the same day.
HOW TO MAKE FUN ANIMAL SHAPE SPONGES
November 22, 2020 by Katie Adams
Animal sponges are easy to make and are fun for kids to use. Learn how to make these fun animal shape sponges here.
This was such a fun and simple craft to do, and now I can't stop thinking about all of the possibilities!
Of course, these sponges make great tub toys, but they could also be added to gift packaging, teach shapes or letters, or so much more!
To make these cute little guys, I got some help from my Cricut. If you don't have one just use templates or coloring sheets online. Cookie cutters also work great to dip in paint or water for an outlined shape.
I am not an artist so I knew I wouldn't be able to freehand the animal shapes, and the Cricut took care of that for me.
CRAFT VIDEO TUTORIAL:
Like videos? I have a video tutorial for you! Subscribe to her YouTube Channel so you don't miss out on any future video tutorials.
Animal sponges are easy to make and are fun for kids to use. Learn how to make these fun animal shape sponges here.
To start, open a new project in Cricut Design Space.
Search the images for shapes that you want to put on your sponges.
I found shapes of a pig, monkey, bear, fish, turtle, and elephant, but you could go with any theme you want.
*note: I did cut off the loop on the teddy bear's head, but I simply did that with a pair of scissors after it was cut out.
You'll want the shape of the animal to take up most of the size of the sponge.
Measure the sponge and adjust the size of the animal to fit inside.
While all the layers of the animals are cute, I don't need them. I only need that base outline shape.
Select the shape and go to the layers panel. Here you can remove the different layers so you are left with the base shape.
When all shapes are adjusted, select Make It and follow the prompts in Cricut Design Space to cut out your animal shapes.
CUTTING THE SPONGES:
Place an animal shape on top of a sponge and trace around the shape with a marker.
Using a pair of scissors, cut around the drawn outline.
Cut around the shaped sponge at a slight angle to cut off any marker that is showing.
The different shapes all turned out so cute and my preschoolers love playing with them in the tub!
Cool Sponge Crafts and Activities for Kids
Who knew there were so many cool things you could do with a kitchen sponge? Kitchen sponges are something you usually have around the house, so why not use them to try out some of these unique kids’ activities! Here’s 12 cool sponge activities for kids!
Kids love usingkitchen spongesto create art. We’ve used them for some really fun projects like our sponge painted caterpillarsand this cuteElmer the Elephant craft. (You can find even more ways to use sponges for creating in this post:Art Projects for Kids Using Sponges.) But, can you believe there’s even more fun ways to use sponges with kids besides sponge painting? You can use them for growing seeds, playing learning games, making a toy boat and more.
When my kids were little they had a fascination with sponges. No matter if they were new or used (yuck!), they seemed to always find them and carry them all over the house. I have found sponges in the oddest places at times, which led me to buy them in bulk. And, of course, they found those too!
Thankfully they are pretty cheap and you can even pick them up at the dollar store, which comes in handy when you’re on a budget. Or when your little ones like to hoard them on a regular basis.
One thing I loved letting my little ones do was create and use their imaginations. There are so many different things they can see that we, as adults, often overlook. That’s what I love about sponges. They are easy to use, easy to clean and make for easy projects to create.
Even though my oldest two have somewhat ‘outgrown’ crafts, they love to get in on the action when we use sponges. I don’t know if its because they are so easy to use or because of the project itself, but I love seeing what they come up with.
Check out these sponge creative play activities for every season, holiday and all ages!
All kids are creative and love to play! Am I right? It’s just the matter to exposing them to the right kind of stimulation that gets their creative juices flowing. For some this stimulant is art and art activities, for some, it could be setting up sensory activities, for some it could be simple tinkering games and for my kids it has always been building activities – any kind of building! As long as it means putting together something, then they are game.
Here is a super fun round up with tons of ideas for creating simple “invitation to build”. There are 25 ideas. C’mon, let’s build and build with something other than BLOCKS!
I have categorized the ideas according to the major material needed. All the images will take you to the original blog.
Today I set out an Invitation to Play for my daughter. Using just 2 different materials that most people have at home, Books and Cars, she engaged herself in building and balancing, experimenting and exploring and a whole fantastic imaginative world full of language development.
Ages: 2-6+
(For ideas to simplify or extend this activity, see the Handy Tips at the bottom)
Materials: Books (hard cover are easier) and Cars
To create this Invitation to Play, I put out a pile of children's books, set a couple of them into small tunnels and provided a couple of wooden cars. Entering the room to find them, she was already excited.
She quickly swept away what I'd set out and got to work building and balancing
Creating Ramps at varying heights and angles produced different results
The books became tunnels, ramps, roads, mountains, garages, houses and more. Yep, just books.
The dialogue this activity produced was incredibly beneficial and my favourite outcome
The amount of time she spent on this activity even surprised me. I'll set it out again with extra/different materials next time.
For more fun Building Activities with stuff from around the house click on the Pictures
Handy Tips:
Simplify
this activity by providing smaller, sturdier books. Board books would be perfect for this. Assist your child in creating simple structures like a garage for the cars or one long tunnel. Set up a few basic book ramps for your child to race their cars down.
Extend
this activity by challenging your child with all different sized, shaped books. Try soft cover books and see if they make a different. Have your child experiment withvarying heights and
angles for ramps and include a measuring tape for added maths skills.
Challenge your child to use every single book in one long continuous tunnel. -
Mix it up
by providing other materials to build with to provide different challenges. Ask your child to look around the house and see what ideas they come up with.
- Make your child aware of the problem solving they are doing. "How are you going to get that ramp to stay leaning up against that book without it falling over?" "Putting the 2 books back-to-back like that for extra sturdiness was a great sollution/idea. Well done!" etc.
Instead of always giving your child directions as to how they are expected to play, I like to mix it up and create "invitations" to play where children can explore and figure out for themselves what they can do.
This type of open-ended activity allows the child to take the activity to a level they are comfortable with while giving them the freedom to explore different angles. Your child may come up with other fabulous games/activities with just these 2 materials.
- Use new language and descriptive words when talking to your child about what they are doing, like, "balancing" and "gravity" This will help with their language development and conceptual understanding.
Creative Building Materials for Kids
By: Jacquie Fisher
A great list of DIY and easily available building materials and construction items for kids!
If you have kids or have played with kids, you know they love to build! Stacking items just seems to be second nature for many children — and stacking things high to see them fall 🙂
Blocks and LEGOs are great, but let’s face it, kids are creative and can find fun ways to build with almost anything.
Creative Building Materials for Kids
One of our kids’ favorite things about going out to eat is being able to use the jelly packets or creamers to build while they wait for their food. I should be taking pictures of the amazing creations they’ve constructed over the years — the wait staff at the resturant is usually very amused when they visit our table.
There are so many wonderful materials that kids can use as construction items!
Quite a few amazing building activities shared during out last Discover & Explore series: Build It (which also includes Engineering books for kids!) and many featured some great DIY building materials. We’re including links to all of these fun & fabulous construction activities along with affiliate links to some awesome building supplies we love too!
Which of these cool items do you have around the house?
Building with Wood & Cardboard Blocks
One of the classic building items all kids enjoy! Blocks aren’t just for stacking either — and they can be made from a variety of materials.
And if the kids are tired of their block structures falling down while building, head over and visit the Fit Kids Clubhouse to learn how to make ‘sticky blocks’!
Having a Colorful Wood Blocks Set will inspire many creative hours and we love wood blocks since they are sturdy enough to be used inside and outdoors. We also love playing with Cardboard Blocks too!
Easy DIY Materials: Cardboard Builders & Boxes
Cardboard makes wonderful building material because it’s not only sturdy but can also be bent and flexible for your design.
I’ve already talked about those fun resturant building sessions with jams and creamers. Really, any small packaged item that has a flat side would lend itself to building.
Another classic building toy that so many kids love to use to create. For younger kids, LEGO DUPLO Sets are the best with larger blocks that are easy to manipulate for smaller hands. Older kids will get years of use out of a Classic LEGO Set — we’ve used ours for fun at home and school projects too!
Here are a few wonderful examples of LEGO creations —
For a set of your own, check out this idea from What Do We Do All Day? — add some magnets to metal items from around the house and you can build some ‘can-structions‘!
I love the science/engineering overlap when you build with magnets – great STEM activity! I promise the kids will try to attach the ‘wrong’ ends of the magnets just to feel them repel each other.
Once your kids are older (since magnets aren’t a safe toy for younger kids), a set of magnetic builders is a worthwhile investment! A set of Colorful Magnetic Sticks is always a popular item when the kids want to build and it’s great for car trips. We also really love the PicassoTiles Magnet Building Tiles.
How about constructing a fort with the kids! Another great building opportunity. And soft-sided items like pillows and blankets create unique building challenges so lots of creative thinking goes into these projects.
Kitchen Counter Chronicles shares that no matter how old you might be, building a fort is still a creative & exciting way to play!
Outdoor Building Ideas: Pool Noodles
They’re not just for swimming! Check out this outstanding train track sprinkler that was created by Play Trains! I love how they used train terminology while constructing the tracks.
Engineering Craft Challenges with Popsicle Sticks
There are a lot of items you can build using popsicle sticks — and no, you don’t have to eat popsicles all summer just to build 🙂 Wood Craft Sticks can be found at many craft stores.
There are all types of recycled items that can be used for building and constructing something new. We love to have a Tinker Box in the house so our kids can create & construct on a whim. We gathered items for the box by deconstructing old electronics we had lying around the house.
Here’s an AWESOME example from Live and Learn Farm of how to use unneeded furniture to construct a box for your chicks (built by a 12 year old – very impressive!)
Using Natural Items for Construction
Things like snow may be weather dependent but when you get a good amount, it’s worth the time outside to create something awesome! Life with Moore Babies shared how building a snow fort can be a great way to learn about construction and design!
We had a neighborhood family that built an Easter Island head instead of your everyday snowman during our last storm. If you have a Snow Block Maker (which can be used with snow or sand!) it’s great for making ‘snow bricks’ as you build.
Other natural items that are great for building include:
Sand – make sand castles!
Sticks – create a fort with sticks and branches
Rocks – nature’s block set 😉
Pinecones – they actually connect to one another so you can build with them!
Unique Building Items for Kids: Styrofoam
And even though it can be messy, styrofoam is another great building material for kids. Pair it with golf tees, pencils and other items that can be stuck together and you too can build some amazing structures like Mama Papa Bubba!
Or cut up a styrofoam egg carton and use the cups as stackers. Pair them with a set of toothpicks and your kids can build towers too.
This play dough activity is no doubt a bit too old for my toddler, but I still really like it. The concept is simple. Find some small sticks (twigs work best) and use the play dough as the base. You are fostering creativity and good fine motor skills.
I don’t know about you, but my toddler is a staunch rock collector. This is a simple learning activity that can be done with your toddler that makes use of their rock collection while providing a brief introduction to the mechanics of building something.
Play-Filled Fun with Playdough
Updated: Dec 29, 2022
Here are some of our favorite ways to play with playdough that are not only fun, but help to develop important skills too.
'Playdough biscuits' using loose parts. Playdough allows for creativity and imagination
Why we love playdough play!
Playdough is a great tool for learning - the possibilities are endless!
Playdough is fantastic for developing strength in your little ones hands. The rolling, stamping, pinching, poking, twisting and squishing are all great for developing fine motor skills and hand eye-coordination too. It is also wonderful for developing creativity and imagination as children are free to create and play however they want.
Playdough can be a great tool for learning too - the possibilities are endless! We will share a few ways that we have enjoyed playing with playdough - some simple and some requiring a few bits and pieces.
*Please note all play ideas in this post were supervised play by an adult. Small parts are for children ages 3+. Always supervise your child while playing.
Homemade Playdough
We usually make our own homemade playdough in the Thermomix following the recipe in the Basic Cookbook. It makes really soft playdough that lasts for ages. We separate the dough in two bowls/bags after it is cooked and kneed through the colouring. If our playdough starts to get a bit dry or tough, I simple add in a few drops of olive oil to it and kneed through to make it soft again! This trick works to extend the life of the playdough and makes it soft again.
Freshly made playdough
Playdough & Scissors
This is a great way to learn to use scissors. You can buy special playdough scissors. Help your little one roll the playdough into snakes to cut with the scissors.
Playdough and Stamps
A fun and simple way to play with playdough. Playdough stamps can be bought or homemade. Craft stores and shops like Kmart sell little packs of wooden embellishments that can be used to make your own stamps at home. With some hot glue and something to stick them on, you can have your own stampers made in no time. A plastic bottle top of a large carton of milk would work, or off cuts of wood. I used wooden rings and a cardboard circle to make ours pictured below, as that was what I had already at home.
DIY playdough stamps are easy to make
Miss 1 enjoys playing with playdough with our large stamps and trying to make prints (play is closely supervised).
Playdough with Animal Figurines
Another great way to play with playdough is to add in a few animal figurines. For little ones, one or two animals and some playdough is enough to encourage some play. For older children you can add some other elements to create a small world. This can be as simple or elaborate as you and your child would like it to be. I usually involve Missy in the creation of these types of play, as it engages her in it for longer. For this flamingo small world below we used some of our Grimms pebbles and trees, some Grapat mandala pieces and a homemade tree to set the scene.
Fabulous Flamingo Small World for Miss 4
Playdough and Loose Parts
Take a simple tray filled with some loose parts (buttons, beads, gemstones, counters etc.) and add in some different coloured playdough for some creative fun.
I usually ask Missy what loose parts she would like to use. Below she enjoyed using fruit counters and crystal chips. She used them to make little ice-cream cups with her playdough.
Small parts for ages 3+
Loose parts add an extra creative element to playdough play
Playdough Cupcakes
Simply add in some patty cases, birthday candles and beads for a fun time making cupcakes. This one is great and one that we come back to again and again, because it is always enjoyed. Depending on the age of your child you can add in different loose parts e.g. buttons, sequins, gems, fruit counters, crystal chips, or pom poms to make it more interesting.
This one can also lead to some fun role-play having a tea party, singing Happy Birthday, or running a cupcake shop.
Add in birthday candles and some beads to make cute little cupcakes!
Playdough Biscuits
Roll out the dough, add in some cookie cutters and some items to decorate and let the fun begin! We used sequins, gemstones and pony beads for decorations. Use some stamps to leave a cute print and then decorate.
Rainbow loose parts and playdough make beautiful playdough biscuits
Coloured Playdough Platter
Choosing one or more colours of playdough and some matching coloured loose parts can make a colourful playdough tray.
Sometimes we choose one colour and add some matching coloured loose parts, like in this purple playdough tray below.
Purple Playdough Invitation: Missy made a boat for the eggs.
Other times it might be several colours. In the tray below we used yellow, purple and pink to create a beautiful tray. Miss 4 helped me to hunt around the house to find loose parts in each of the colors.
Colourful Playdough Platter
The round tray underneath is a wooden board from Kmart found in the kitchen section. The sectioned tray holding the loose parts is QToys brand, which we bought online from Rata & Roo Toys.
Invitation to Create
This is one that was set up based on Missy's interest in bugs. We used a tray of loose parts - pipe cleaners, googly eyes, pieces of wood, mini bugs & flowers (CollectA toobs). Missy decided what to make with the loose parts. This is a great way to encourage creativity while playing.
Everyday Play with Playdough
Most the time we simply grab some playdough out and add a few simple stamps or cutters to make it fun. We have a playdough kit that lives in our dining room. The girls can choose which colour playdough they would like to use and then some stamps, cutters, other items to use with it.
Simple Playdough for Two
Sometimes we enjoy something a bit fancier, which is when we will use one of these ideas from above.
Try not to fall into the trap of thinking that fancier = better play, because it doesn't. My girls like simple things and play for longer when they have input into what is put out for them to play with, when it follows their interests and when they help make the special set up. The vast majority of our 'real' everyday play does not look 'pretty', but this does not make it any less fun, meaningful or purposeful for my little ones.
Playdough is heaps of fun for young kids to play with. Simple and easy to make, and inexpensive is a plus too! But what do you do when both you and your kids have run out of ideas for playdough time? Below you will find simple and interesting playdough activities for toddlers to preschoolers to enjoy. Some homemade playdough recipes are easy to customize to suit your kids’ interests, seasonal themes, or holidays!
OPEN-ENDED PLAYDOUGH FOR EARLY LEARNING
HOMEMADE PLAYDOUGH
Playdough is excellent for many reasons! It is a great sensory tool for hands-on early learning activities like letters, numbers and colors. Playdough is also a great muscle strengthener for little hands getting ready to write. It is relaxing to knead, roll, stretch, flatten, pound and whatever else is fun! It adapts to themes like a charm. Playdough loves to pretend, create, build, imagine and discover. Because of all these great developmental aspects about play dough, I like to pull it out and give it a fun theme twist. Hope you enjoy these fun playdough activities anyone can do!
THINGS TO DO WITH PLAYDOUGH
Turn your playdough into a counting activity and add dice! Roll and place the correct amount of items on rolled out playdough! Use buttons, beads, or small toys for counting. You could even make it a game and the first one to 20, wins!
Add number playdough stamps and pair with the items to practice numbers 1-10 or 1-20.
Mix small items into your ball of playdough and add a pair of kid-safe tweezers or tongs for them to find things with.
Make a sorting activity. Roll out the soft playdough into different circles. Next, mix up the items in a small container. Then, have the kids sort the items by color or size or type to the different playdough shapes using the tweezers!
Use kid-safe playdough scissors to practice cutting their playdough into pieces.
Simply using cookie cutters to cut out shapes, which is great for little fingers!
Turn your playdough into a STEM activity for the book Ten Apples Up On Top by Dr. Seuss! Challenge your kids to roll up 10 apples out of playdough and stack them 10 apples tall! See more ideas for 10 Apples Up On Top here.
Challenge kids to create different size playdough balls and put them in the correct order of size!
Add toothpicks and roll up “mini balls” out of the playdough and use them along with the toothpicks to create 2D and 3D.
Make your own homemade black playdough and put together an open-ended Death Star kit. Our Star Wars fan had tonnes of fun with this playdough activity!
I had not heard of the concept of invitation to play until I did some research for this article. The idea is to set out a bunch of different play materials and allow for open-ended play (which is my favorite!)
I thought this snowman kit was a super cute idea! This is a great activity to make in a classroom or during a play-date. You can have the kids assemble the kit and make a snowman now, or let them take it home for a rainy day.
This cute play dough activity includes printable labels, which makes it a great Christmas activity for the classroom or just for fun. There is a cute poem at the bottom of it that is editable if you want to write something in of your own.
This STEAM (science, technology, engineering, arts, and math) activity allows for critical thinking while still having fun with play dough. The objective of this activity is to construct a freestanding tree (with leaves). The “tree” is sitting in play dough.
This blog post has clear-cut instructions to make this a perfect learning activity.
I loved the idea of taking playdough outside with your little one. Getting some fresh air is almost always the right thing to do, and this activity really allows for your child to use their imagination.
I thought this was a nice idea – using trees as your canvas. You are making little portraits on tree bark. This is a fairly open-ended activity, so encourage your little one to make a picture of themselves, a friend, or the cat at home.
This play dough activity was such a good idea (and super simple!) Use your phone to look up Patience with Herbert the Snail. This song (along with the playdough snail concept) can help your little one learn about patience.
This simple play dough activity is a great one for toddlers. This can help improve fine motor skills, as your child will need to move the play dough into the shape of an “egg”. Bonus points if you have dinosaur cookie cutters!
I don’t know if you have used playdough mats before, but if you haven’t you should! Playdough mats kind of remind me of coloring books. They give you a basic template and allow for your child’s creativity to create the rest of the art piece.
This particular playdough mat is of a pickle-shaped dinosaur shape. It is up to your children to create the rest of the dinosaur.
This activity goes along with a book – which makes it another great option for a learning and fun activity (we are totally picking up the book today!) This play dough activity shows your child what happens when you mix colors together, which is an exciting way to learn about that!
My daughter and I finished reading Dragons Love Tacos the other night. If I am being honest, it’s not one of my favorite books. My daughter got a kick out of it though, so I guess that’s what counts. 😉
This playdough activity includes a playdough recipe in addition to the pretend-play inspired activity.
I don’t know why, but I have always liked gingerbread men. My daughter LOVES decorating cookies, so this playdough activity is perfect for her. This blog post also includes a recipe for gingerbread playdough, so you may have all of the supplies necessary around your home!
I don’t know about you, but my little one loves playing with cars. Making her own little car village was really exciting for her. This blogger included ten free road templates so your little one can have a map to help them create their new little city.
This playdough activity is similar to the snowman one – except you are building a zoo (which is a bit more work!) This project will take more supplies, as you need popsicle sticks and some way to print off the zoo animals.
The result is cute and something most toddlers would play with over and over, so I think it’s worth it!
If you have a child that enjoys digging, this digger playdough activity could be a lot of fun. This is a great open-ended activity that will allow your little one to explore their imagination.
This blogger’s mission is to offer you (the parents) as many free printable resources as possible. Right now, she’s giving away ten different printable playdough mats that are all labeled with questions.
I think my favorite is “what’s for dinner”? I can only imagine what the toddler would create! This is definitely on my list of toddler-friendly playdough activities.
We hope you found some ideas to try and will have some fun of your own playing with playdough with your little ones.
I love watching children play. Last weekend I had a field day when my nieces were staying over and the three girls set about creating a loose partssmall world with any toy that caught their eye. It was gorgeous to watch and a whole lot of fun to join in.
Keep scrolling to see what they made of it and get some great tips on how to encourage imaginative play in children.
TOP TIP FOR ENABLING LOOSE PARTS SMALL WORLD PLAY
As the girls (age 6, 6 and 8) set to work creating their small world with loose parts sourced from toy (and craft!) baskets all over the house, it made me realize what an amazing gift it is to be able to jump into your own fantasy world just like that. Not everyone can do that. Most adults struggle but there are also a number of kids who find imaginative play quite challenging.
I figured out that there are probably a number of things you can do to set the scene just so, making small world play (or imaginative play in general) a lot easier.
1. Have open ended toys. We often opt for the basics: blocks, figurines, animals, vehicles, …
2. Have them available. We have our toys in baskets, ready to play and easy to tidy up.
3. Have a limited amount. We rotate what is in the baskets, too many toys overwhelm. See point 1: stick to the basics.
4. Have loose parts: buttons, fabric scraps, craft supplies and random items from around the house.
5. Have a couple of gems or handmade toys. With gems I mean treasures you might have picked up from a garage sale or literally crystals or mini treasure chests. Handmade toys are very special to children as they were often a meaningful gift or an activity they did with you and helped made themselves. (For example these little felt purses or mini sleeping bags.)
6. Have an inviting place to play.
And for the little ones who need an extra bit of encouragement: set up an invitation to play, invite a friend over to play or join in yourself to get them started.
INTRODUCING THE GIRLS’ LOOSE PARTS SMALL WORLD
Let me quickly talk you through this amazing small world the girls created.
They started out building with Magna Tiles (which, by the way, if you’ve never heard of you should really google!) and once their house was built, they added Playmobil. There was a scramble to get the most Magna Tiles and the favourite Playmobil parts but as loving cousins, they figured it out. Then they added loose parts and added and added. They found Safari Mini Lucky Charms, fabric scraps, blocks, buttons, rocks, seashells, glass gems, craft supplies, … The more the merrier. And this is I think the funnest part: listening in and watching them create. As they discuss ways to ever expand their homes they get more creative: “I need this. What could I use?” and they start going through kitchen drawers and anything else within reach. It’s absolutely fabulous!
This kind of out of the box thinking and problem solving is really setting them up for life. It comes so naturally to most kids, all we need to do is help them hold on to it!
THE MAGIC OF LOOSE PARTS SMALL WORLDS
These simple guidelines above might just be the thing to get your children into a loose parts small world state of mind this winter. As the days are getting shorter and colder, nothing beats a cosy afternoon of play time in your jammies in front of the fire. I have such warm memories of those moments myself that I would love to pass on to my children.
And as I discussed a few of my favourite topics today being small world play and loose parts, you might want to know I’ve written a whole bunch of articles about them and shared some great easy play ideas. You can find everything about small world play here and everything about loose parts play here.
We’ve done so many activities that involve open ended little worlds. Small world activities foster language development, story telling, self-confidence, fine motor skills, sensory exploration, and more.
Outdoor small world– We set this activity up under the base of a tree. Use materials like sticks, flowers, rocks, pebbles, roots, grass, etc.
Fairy small world– set up a fairy pretend area in a sand box. Use items like craft houses, rocks, and even glittery items.
Kids are fascinated by animals. Whether they are seeing real animals, reading about them, or doing projects related to animals, kids always seem to be drawn to activities that involve animals. Here you’ll find some of our favorite animal activities for kids. Choose from books about animals, animal crafts, animal sensory play ideas, animal theme games for kids, and even recipes!
ANIMAL ACTIVITIES
ANIMAL BOOK LISTS
Penguins – These penguin books are perfect for an arctic animal unit or a fun penguin theme!
Underground Animals – Have your kids ever wanted to know more about the animals who live underground? Now they can with these fun and interactive books!
Animals of Australia – Learn all about the unique species who call Australia their home with these amazing books about animals of Australia.
Pandas – Pandas are unique and unlike your traditional type of bear. Learn all about them with the help of these books!
Animal ABC Books – Use animals to help your kids learn their ABCs with these helpful books.
ANIMAL SENSORY PLAY IDEAS
Dinosaur Sensory Bin – Create your very own prehistoric dinosaur world using this dinosaur sensory bin activity.
Dinosaur Small Worlds – Create and play with dinosaurs in these fun dinosaur small worlds.
Simple Pond Sensory Play – Create your own simple pond world sensory play and learn about the animals that live there.
Coral Reef Sensory Play – This coral reef sensory play is all about ocean animals and is a fun and interactive way to learn about the big blue sea.
Simple Farm Sensory Play – All you need is one ingredient to do this simple farm sensory play activity.
Farm Small Worlds – Bring the small town farm right into your home with these farm small world activities.
Penguin Sensory Play – Create a fun sensory play activity for your kids this winter with this penguin sensory play activity.
Zoo Theme Sensory Play – These zoo theme sensory play activities are a fun and engaging way to teach your kids about zoo animals.
Edible Zoo Small World – Invite your children to create their own zoo that they can eat with this edible zoo small world activity.
If you’re doing a unit all about underground animals, make sure to grab these Underground Animal Theme Resources for a fun underground animal theme unit for your kids!
RECIPES
Moose Track Cookies These delicious moose track cookies are the perfect treat to enjoy while reading through the book Moose Tracks!
Penguin Snack If you’re looking for a quick and easy snack idea, you can’t go wrong with this penguin snack.
Small World Zoo in a Cardboard Box
We do tons of play, crafts, and activities with recycled materials. Cardboard boxes are a bit hit in our house! We are very excited to join the Project Recycle & Create series each month this year as we create, explore, and play using recycled materials. This month is all about creating with cardboard. We made a small world zoo that encouraged pretend play, fine motor skills, imagination, language development…and FUN! Open-ended play is something we love and have done before with many themes and senses. This zoo themed small world stayed out for a while and was a huge hit with the cousins.
My little girl is a big fan of Little People. We pull out the Little People Learning Zoo Playsetalmost daily. The animals were definitely needed for our cardboard zoo.
Using a large piece of cardboard, I drew a pathway and a few areas for the animals. Little Guy provided great input about what we needed in our zoo. He said we needed a few cages for the animals and an igloo for the polar bear. He set all of the animals around the zoo and gave everyone a home.
We added a few Little People from theFun Park set to walk through our zoo.
This DIY zoo play mat sat out in our dining room all day and once the Toddlers were up from their nap, they were excited to get in on the play too! What a great way to encourage pretend play and language!
We had so much fun with our pretend play zoo. And, it doesn’t get much easier to set up a small world for hours and hours (days…) of imagination and pretend play! How many small worlds can you create with just a few sheets of cardboard?